Stay inside, we need to plan
wash your hands (happy birthday, twice)
Wear a mask
where’s the plan?
There is no plan, please wear a mask
Public freakout
Just wear a fucking mask!
Zero cases in New Zealand
Fuck New Zealand
fifty thousand cases a day
Fuck America
Used to love Erma Bombeck
on the Fourth
potato salad and flags
Happy Independence Day
but not lately
we should try
to make America great again

07.04.2020
06.20.2020
A few years ago as a part of my explorations with Swift, I started statically generating this site using Swift. Now, this was way back in the bad old days of Swift 3, before we had modern conveniences like ABI stability — so when I upgraded my personal laptop this winter, I inadvertently lost the Swift toolchain that I had used to compile my customized fork of Spelt. After a bit of spelunking, I realized that it had been built with some beta version of Xcode long since lost to the sands of time — I was stuck with a binary I couldn’t run.
As Spelt was no longer being actively developed, rather than take the time to convert it to Swift 5 and recompile I used the disruption as an opportunity to move to a newly released Swift static site generator, John Sundell's Publish. Over the course of the week I spent converting this site to use Publish, I was frustrated by a lot of the built-in assumptions and general inflexibility. While I am sure that it is a great Swift by Sundell generator, it is not (yet) a great general-purpose static site generator.
But the beauty of open source is exactly that, so I forked it and fixed my two biggest issues. The first issue is that it insists on using Ink as the Markdown parser. Ink doesn't fully support CommonMark and couldn't correctly parse some of my posts so I added a custom content parser block and replaced Ink with this CommonMark package. This also provided me an entry point where I could add parsing for markdown footnotes1. The second paper cut was the lack of control over paths. The simple fix was to add a new mode for clean links but it would have been nice for a bit more built-in flexibility here.
One of the things about Publish that is technically neat is it's HTML DSL2 Plot. What this means in practice is that you can write HTML in Swift like this:
let body = HTML(
    .body(
        .div(.class("pure-g"),
             .div(.class("pure-u-0-4 pure-u-md-1-12 pure-u-lg-1-4")),
             .div(.class("pure-u-1-1 pure-u-md-5-6 pure-u-lg-1-2"),
                  .header(for: self),
                  .itemList(for: items),
                  .paginator(currentPage: page, context: self)
             ),
             .div(.class("pure-u-0-4 pure-u-md-1-12 pure-u-lg-1-4"))
        ),
        .footer(for: site)
    )
)
Like I said, kinda neat! In practice I found it to be more clunky and mistake-prone than just writing HTML with Mustache templates, which is what I was converting from.
My last complaint is a more general one — Swift generics are still too difficult to use, and the error messages provided by Xcode make them unapproachable for novices and experts alike. I would do everything I could to not expose generics in the API of a library I published.
Above gripes aside, my overall experience was a positive one. The "steps" model used by Publish makes the whole system extensible by design, and the included RSS feed generator step
means that this site now has one. I was able to easily add and plug in a S3 deployment method that uses the AWS CLI, which ended up inspiring me to convert the whole process into a Github Action that builds and deploys the site automatically whenever I push to main. Oh, and there's a dark mode theme now.
If you're interested, the full source is available here3.
01.01.2020
Had a second kid! Took time off for paternity leave. For the first time since 2016 I didn’t change jobs in September. We didn’t move this year and are happily settling (back) into our life here in Durham, NC.
Shipped some software — I updated my personal website, shipped a macOS Catalina compatibility update for Later and helped build the new App Home surface for Slack. Got interested in gRPC, microservices, and Kubernetes. Remained interested in Swift.
The rest of my 2019 highlights:1
Books
- Blackfish City: A Novel by Sam J Miller -- Incredible world building, a little unevenly paced.
Music
- The 1975 - A Brief Inquiry Into Online Relationships
- The Beths - Future Me Hates Me
- Big Thief - U.F.O.F
- Bon Iver - i,i
- LCD Soundsystem - Electric Lady Sessions
- The New Pornographers - In the Morse Code of Brake Lights
- Ryley Walker - Golden Sings That Have Been Sung
Apps (iOS)
Apps (macOS)
Games
- Baba Is You
- Outer Wilds -- An absolute masterpiece. One of the best games of the decade.
- Super Mario Maker 2
Listed alphabetically.↩︎
01.01.2019
Another year of big changes. We moved again and bought our first home, a beautiful old American Foursquare in our old neighborhood. Astro was acquired by Slack in September, making it three straight years of September job changes. In November, we celebrated my daughter's 1st birthday, and parenting continues to be the most exhausting and rewarding part of my life. Here's the 2018 media that was the backdrop to my year1.
Books
I read a lot of average tech-adjacent non-fiction in 2018, none of which is worth recommending here. Resolving to read more fiction in 2019.
Music
- BØRNS - Blue Madonna
Apple Music/Spotify - Collections of Colonies of Bees - HAWAII
Apple Music/Spotify - Lord Huron - Vide Noir
Apple Music/Spotify - Snail Mail - Lush
Apple Music/Spotify - State Champion - Send Flowers
Apple Music/Spotify - Superorganism - Superorganism
Apple Music/Spotify - Wye Oak - The Louder I Call, the Faster It Runs
Apple Music/Spotify
Apps (iOS)
Apps (macOS)
Games
- Celeste
Switch/PC/PS4/Xbox - CRYPTARK (2015)
PC/PS4 - Deep Rock Galactic (Early Access)
PC/Xbox - Hollow Knight (2017)
Switch/PC/PS4/Xbox - Into the Breach
Switch/PC - Minit
Switch/PC/PS4/Xbox - Monster Hunter: World
Switch/PC/PS4/Xbox - Mutant Year Zero: Road to Eden
PC/PS4/Xbox - Slay the Spire (Early Access)
PC
All lists are alphabetical.↩︎
12.21.2018
After reading Mattt's excellent NSHipster article on building the fledgling Swift Language Server Protocol project, I scrolled back up and stared at Step 0: Install Xcode. It didn't seem strictly necessary, based on what followed. And as I’m sure you’ve deduced by the title and existence of this post, it’s not. Below is a short step-by-step guide to building and running the Swift Language Server Protocol on linux1. The following instructions assume either a basic understanding of a unix-style command line and/or a willingness to copy and paste superuser commands from the internet into your terminal program of choice.
- Install VS Code by following these instructions: https://code.visualstudio.com/docs/setup/linux
- Make sure that you have all the necessary dependencies installed:
$ sudo apt install curl git clang libsqlite3-dev libblocksruntime-dev libncurses5-dev - Download the recommended Swift development toolchain from swift.org or via the command line:
$ curl https://swift.org/builds/development/ubuntu1804/swift-DEVELOPMENT-SNAPSHOT-2018-12-07-a/swift-DEVELOPMENT-SNAPSHOT-2018-12-07-a-ubuntu18.04.tar.gz > ~/swift-DEVELOPMENT-SNAPSHOT-2018-12-07-a-ubuntu18.04.tar.gz - Extract the toolchain and move it to
/usr/local/bin:$ sudo tar xzf swift-DEVELOPMENT-SNAPSHOT-2018-12-07-a-ubunutu18.04.tar.gz -C /usr/local/bin - Add Swift to your command line path:
Now, let’s run$ export PATH=/usr/local/bin/swift-DEVELOPMENT-SNAPSHOT-2018-12-07-a-ubuntu18.04/usr/bin:"${PATH}"$ swift --versionto make sure that we’ve downloaded and installed Swift correctly. You should see this output (or similar, depending on the version of the toolchain you installed):Swift version 5.0-dev (LLVM b10ce3d642, Clang c1979d7668, Swift 94b167db75) Target: x86_64-unknown-linux-gnu - Clone and build Apple’s sourcekit-lsp project:
$ git clone https://www.github.com/apple/sourcekit-lsp.git $ cd sourcekit-lsp $ swift build -Xcxx -I/usr/local/bin/swift-DEVELOPMENT-SNAPSHOT-2018-12-07-a-ubuntu18.04/usr/lib/swift - Move
sourcekit-lspandlibSwiftPM.soto/usr/local/bin:$ sudo mv .build/x86_64-unknown-linux/debug/sourcekit-lsp /usr/local/bin $ sudo mv .build/x86_64-unknown-linux/debug/libSwiftPM.so /usr/local/bin - Install Node.js 11.x or newer:
$ curl -sL https://deb.nodesource.com/setup_11.x | sudo -E bash - $ sudo apt-get install -y nodejs - Generate the extension for VS Code:
$ cd Editors/vscode $ npm run createDevPackage - Install the extension you just created:
$ code --install-extension out/sourcekit-lsp-vscode-dev.vsix - Point sourcekit-lsp at your installed toolchain in VS Code’s settings (File > Preferences > Settings > settings.json):
"sourcekit-lsp.toolchainPath": "/usr/local/bin/swift-DEVELOPMENT-SNAPSHOT-2018-12-07-a-ubuntu18.04/usr/bin" - Reload your VS Code window (Control+Shift+P > Reload Window) or restart VS Code.
At this point, you’re all set up to use the Swift Language Server on linux. A few notes: you will see the most functionality for projects that have a Package.swift file that have been pre-built with swift build.
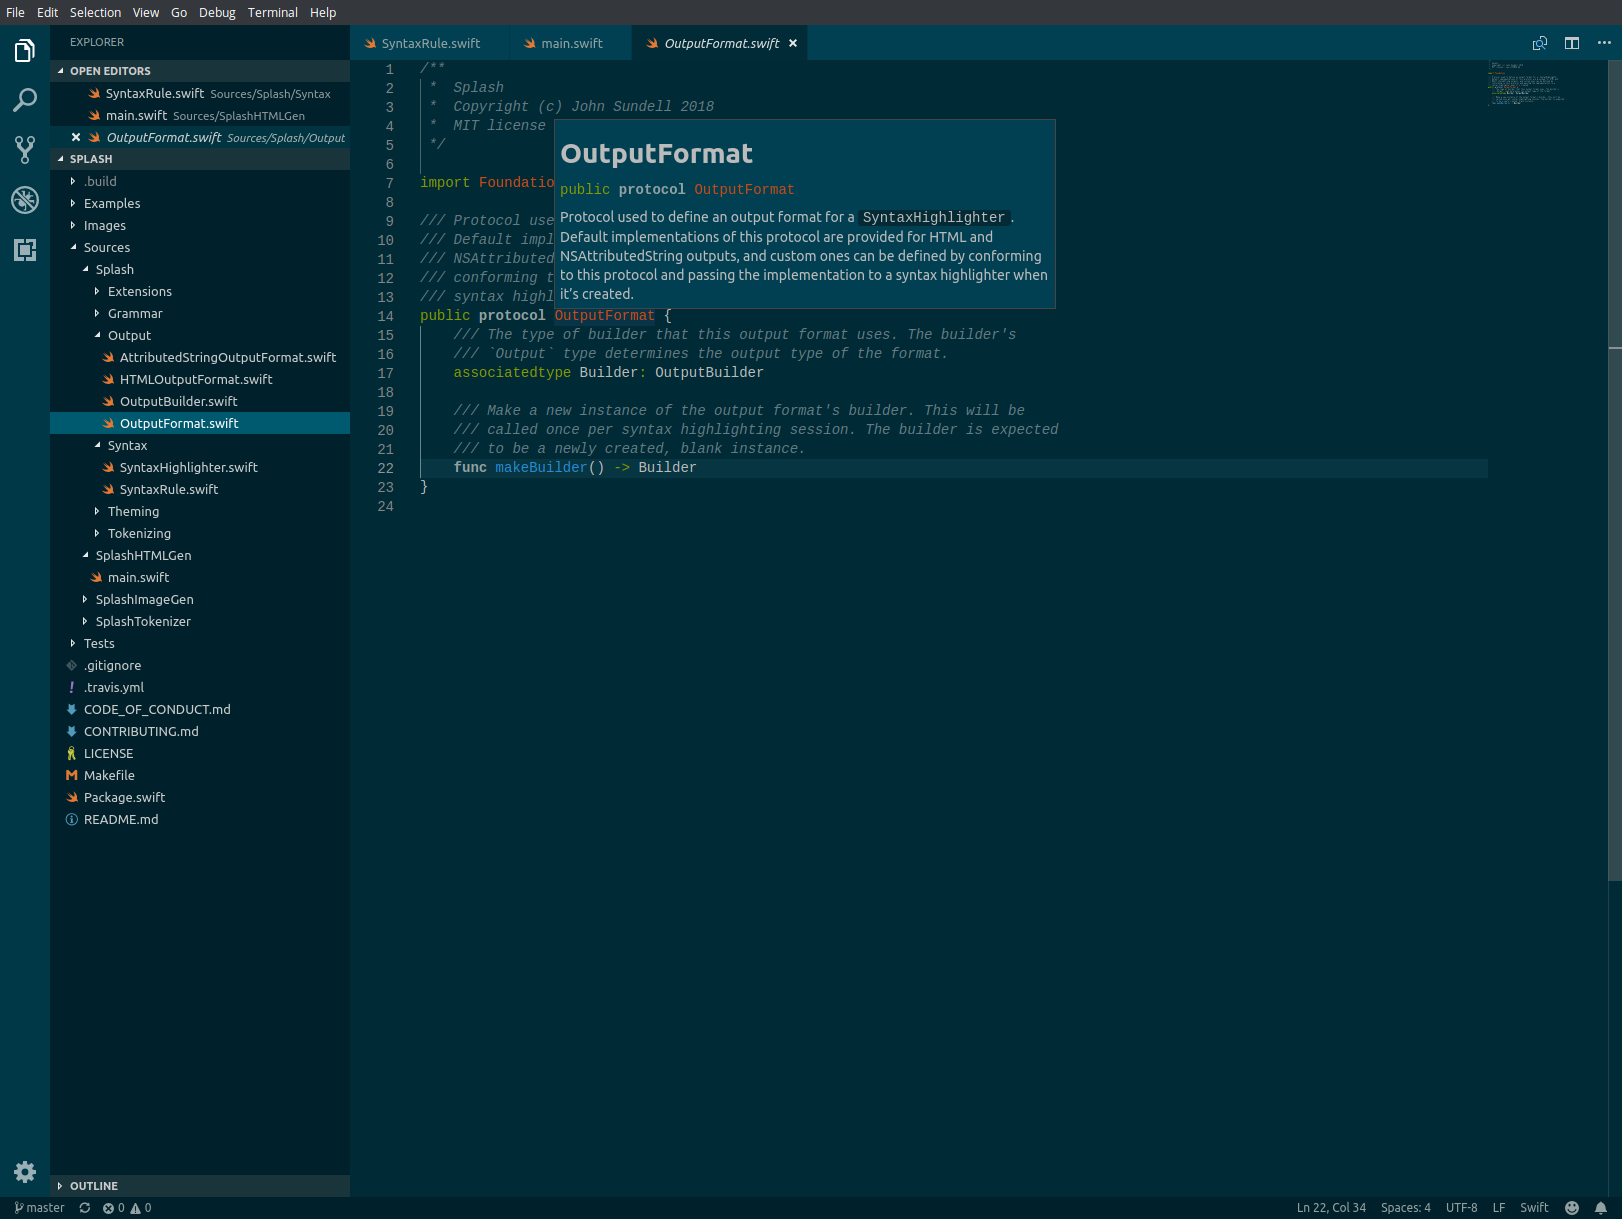
Let’s clone and build a sample project so we can see it in action:
$ git clone https://www.github.com/JohnSundell/Splash.git
$ cd Splash
$ swift build
Finally, open the Splash folder in VSCode and try some of the following to see it in action:
- Hover over a
structname - Command+Click to jump to a definition
- Type some code and invoke autocomplete
There has been a lot of enthusiasm around the announcement of this project, and for good reason. It serves as yet another reinforcement of Apple’s broad goals for the Swift programming language, which seem to extend further beyond the friendly confines of their own platforms with each passing year.
Tested on Ubuntu 16.04 and 18.04. The commands below all specify the 18.04 versions where necessary.↩︎